For me it’s about freedom. Timelapse photography is a strange thing: It can free you from the normal flow of your routine and all the busyness of life, yet at the same time it can connect you to your surroundings more than anything else – It has a way of slowing the world for you the photographer while at the same time accelerating it for everyone else. It’s a way to cut through the noise and find fresh energy to share with others.
…not many years ago, it was access to information and movement that seemed our greatest luxury ; nowadays it’s often freedom from information, the chance to sit still , that feels like the ultimate prize – it provides the opportunity to come closer to one’s senses…
Heaven is the place where you think of nowhere else. -Pico Iyer: The Art of Stillness
It’s a real honor and privilege to partner with you on this timelapse training journey. I am continually humbled by your shared work, comments and ideas – this is truly a community effort and I am grateful for your involvement.
Welcome to the main timelapse how-to post: how to make a timelapse video
Timelapse 101 weaves together separately covered tutorials, tips, and resources into one location and aims to act as a launching pad for fun and professional experiments in timelapse photography. Skip to whatever section is of most interest at the moment or just start from the top. If you are looking for the ultimate structed and detailed guide to all things timelapse photography you may want to consider my timelapse book (Print, PDF, Kindle, iPad). Your support makes all this possible and it’s what keeps me goin’… Thank you.
How to make a timelapse video
Starting at the beginning…
You probably stumbled upon an incredible work of timelapse and just couldn’t get those unique images and feelings out of your head. Possibly you’re fascinated by nature and the slow changes that occur over a period of time – a flower blooming, a sunset or a moonrise. Maybe it was a construction project or a cityscape at night, full of activity and production. Either way it was the capture of change in a way that we don’t normally see, the telling of a story and change that makes time-lapse what it is. If you are brand new to timelapse let’s start by answering a few questions:
What is timelapse photography?
Where did timelapse photography originate?
We’ve come a long way since Occident’s hooves left the ground but time-lapse still requires patience, dedication, and some special tools and know-how in order to get the scene we design in our minds to show up on screen.
Timelapse Gear: Essentials
Don’t worry, it’s not nearly as bad as you might think. If you’ve already been taking photographs with a DSLR then chances are you have most of what you need. Digital photographers love their gear but here’s a barebones checklist to get you up and running:
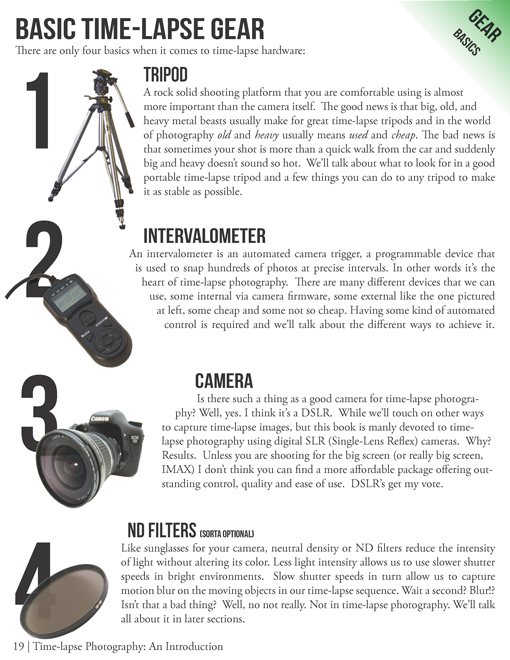
Timelapse book page 19: Gear basics
Never forget that all the great photographs in history were made with more primitive camera equipment than you currently own. – Brooks Jensen
Tripods and camera support
[aside][sideimage href=”https://www.learntimelapse.com/wp-content/uploads/2013/03/timelapse-tripods.png” src=”https://www.learntimelapse.com/wp-content/uploads/2013/03/timelapse-tripods.png”]Quick tips to make any tripod more stable[/sideimage][/aside]
Stability (or controlled movement) is the most essential component for a time-lapse photographer. I even listed this before a camera. A heavy sturdy quality tripod is an absolute must. Sometimes older heavy workhorse used models can be an inexpensive gold mine (check craigslist) but if you are looking to travel newer designs and moderate weight materials will be your friend. If you do buy new, it pays to do it right once rather than regret and re-buy later.
How to select a tripod for timelapse photography
Tips for making tripods super stable (Video tutorial)
Tripod Reviews
Specific reviews (links/videos/ writeups in the works):
- Manfrotto MK293C4-A0RC2 4 Section Carbon Tripod Kit with Quick Release Ball Head [field tested] (amazon)
- Benro A0690T Travel Angel Tripod Kit with Aluminum Twist Lock Legs with BH00 Head [field tested] (amazon)
- Manfrotto MK294C3-A0RC2 3 Section Carbon Fiber Tripod Kit with Quick Release Ball Head [new item in test] (amazon)
- Dynamic Perception D-Pod Micro Tripod [field tested] (link)
Cameras for timelapse
What makes a good time-lapse camera? Well…, talk about a loaded question. DSLR and mirrorless cameras have several advantages and are the focus of this site, but chances are if it can take a picture then there’s probably a way to make a time-lapse.
Things to consider when buying a timelapse camera
What cameras I use for timelapse (expanded section in the works)
Timelapse Camera Reviews
Specific reviews (links/videos/writeups in the works):
- Sony Alpha a7s [currently in test] (amazon)
- Canon EOS Rebel T3i [field tested] (amazon)
- Canon 7D [field tested] (amazon)
- Canon 5D Mark III [field tested] (amazon)
- GoPro Hero 3+ [field tested] (amazon)
Remote timers and timelapse intervalometers
The goal is accurate and reliable automatic shutter triggering, that’s what an intervalometer does and if you don’t have one built into your camera already there are several different kinds to consider:
Timelapse remote triggers and intervalometers: How to choose the right one
Guide to remote timer camera cable types

Satechi (3rd party) Intervalometer
I have broken the remote timer world down into 6 segments. Here are quick links directly to their places inside the “How to choose post”
- 3rd Party Manufacturers (Good: some are perfectly good and cheap)
- Name brands (Good, but more expensive)
- In Camera and Magic Lantern (Darn good, but some lack features and require DIY work) [dedicated writeup in the works]
- Advanced (Better: expensive but offer more features)
- Advanced Exposure Ramping (Best: The ultimate solution for day-to-night or night-to-day transitions) [dedicated writeup in the works]
- Home-built and DIY (Maker: Some are hard to make and lack features and field reliability, but they are just downright cool to come from your brain and hard work)
Timelapse Remote Timer Reviews
Specific reviews (links/videos/writeups in the works):
- Aperture timer remote [field tested] (amazon)
- Satechi timer remote [field tested] (amazon)
- Timelapse+ [field tested] (website)
- Promote Advanced HDR and timelapse controller [field tested] (amazon)
- Ramper Pro from Elysia Visuals [currently field testing] (website)
- Magic Lantern (on a Canon 7D) [currently field testing] (website)
- Trigger Trap [currently field testing] (website)
Neutral density filters
Essentially sunglasses for your lens, ND filters reduce the amount of light entering the camera without altering it’s color. ND filters allow slower shutter speeds and come in handy when we want to create motion blur by dragging our shutter. Motion blur and shutter dragging are discussed inside this explanation of time-lapse exposure.
I used an ND filter in this time-lapse exposure and interval tutorial video (***amateur tutorial warning*** 🙂 ). The link starts the video about half way through when the filter is explained.
Dedicated ND filters master currently being written (check back soon).
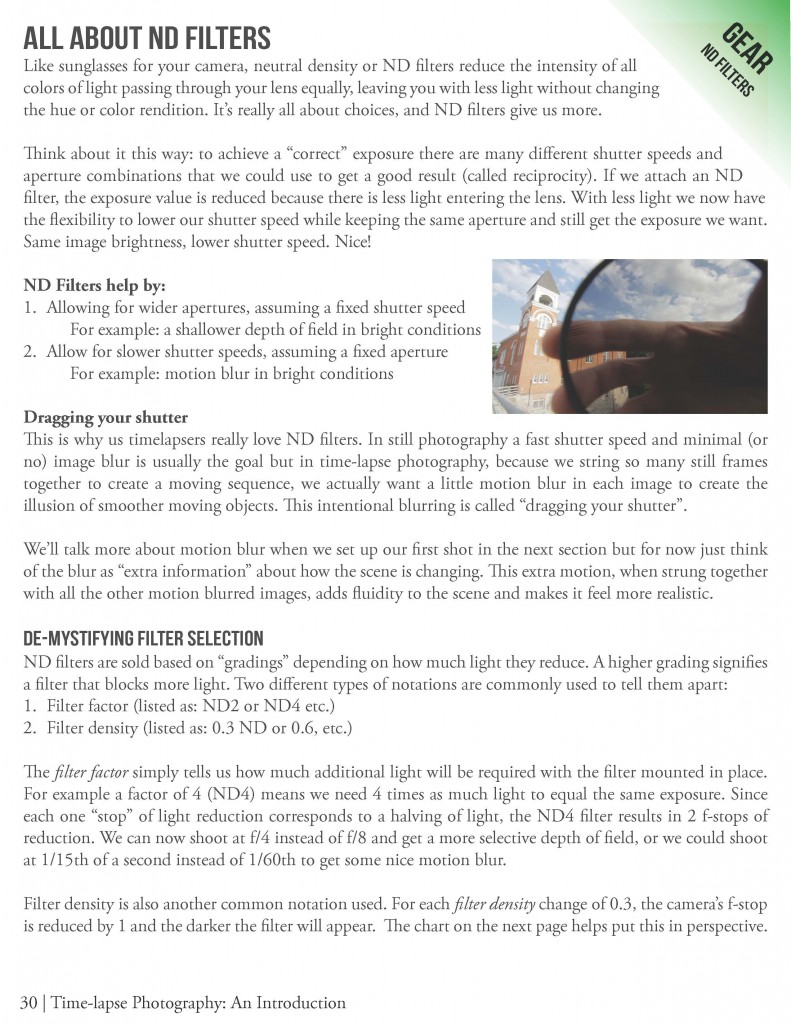
Timelapse book page 30: ND Filters part I
Helpful accessories for timelapse shooters
Battery Grip
Most DSLR’s have an accessory available that allows you to extend the size of the camera’s battery compartment and house two batteries instead of one. Most timelapse sequences (with the exception of astrolapses) can get by on one fully charged battery, but the piece of mind of knowing I can shoot a sequence, pick up the camera shoot stills, shoot some video, then setup for a second sequence is well worth the extra $75 (Amazon). I highly recommend a battery grip.
Extra Batteries
No explanation needed 🙂
Extra Memory Cards
No explanation needed but we do discuss the importance of higher memory write speed capable cards to keep your buffer time to a minimum.
Card Reader
If you don’t already have one I highly recommend this too. Since we’ll be transferring large numbers of photos there no sense in using camera battery power while we wait for images to transfer. You might want to spend just a few more dollars and invest in a name brand unit. Memory cards are very expensive so protect them. (amazon)
Shooting Timelapse Sequences
First things first, don’t just approach a scene, set down your tripod and begin shooting because guess what?

You’ll end up with a shot just like everyone else’s.
It pays to take your time, look around, and pay extra attention to your composition. As a timelapse photographer we have an incredible creative tool that few other photographers have, and that’s change. Try to anticipate how your scene will change over time and what composition best captures this change.
- Do you want to limit focus?
- How do the edges of the composition look?
- What about your foreground?
- Are you following the rule of thirds?
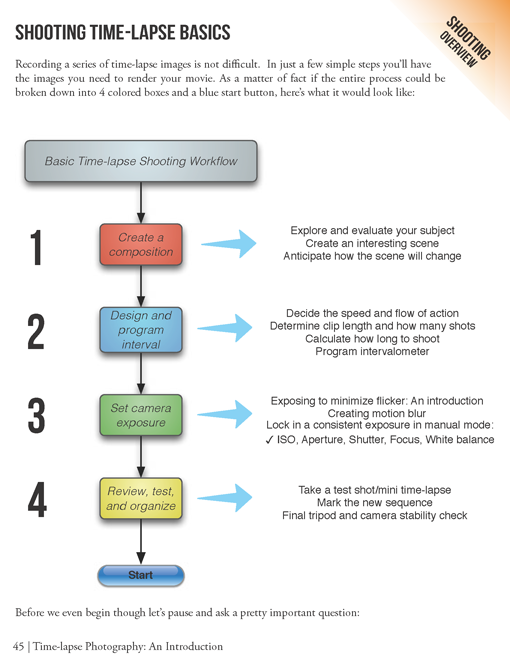
Timelapse book page 45: Shooting basics flowchart
Lock down your tripod and camera
- Don’t extend your tripod all the way and use the thicker legs first.
- Avoid extending the vertical center rod unless you absolutely have to.
- Hang a heavy bag of rocks or gear from the center of the tripod to really press it into the ground
- Consider making or buying a few bean bags to use as weight and to set on-top of your camera
Going the extra yard for stability now, instead of trying to correct a shaky time-lapse later, is worth it.
Select a Time-lapse Interval
The interval you select (in relation to the movement that is taking place in front of you) controls how fast the scene appears in the final compilation video.
Main Article:
How to select a timelapse interval: With examples.
Timelapse exposure and interval tutorial video (jump to the video section)
Common Time-lapse Intervals
No two scenes are exactly alike, but these common intervals may give you a head start:
1 second intervals:
Moving traffic
Fast moving clouds
Drivelapses
1 – 3 second intervals:
Sunsets
Sunrises
Slower moving clouds
Crowds
Moon and sun near horizon (or telephoto)
Things photographed with a telephoto
15 – 30 second intervals:
Moving shadows
Sun across sky (no clouds) (wide)
Stars (15 – 60 seconds)
Longer Intervals:
Fast growing plants (ex vines) (90 – 120 seconds)
Construction projects (5min – 15min)

Wikipedia CC license
Frame interval > Exposure time
Your interval MUST exceed your exposure time. A good rule of thumb is to keep your exposure at about 60% – 80% of your interval to give your camera enough time to clear the image buffer before the next frame is taken.
Avoid dropped frames
Think of your camera’s buffer like a pipe connecting the newly recorded image and you camera’s memory card. It takes a little bit of time (depending on your image resolution) for the information to be processed and flow from one place to the other. If you try to send images too quickly some may get lost (your camera will skip a frame). Bad news. I’ll be explaining the concept of camera buffer “dropped frames” in greater detail in a separate post, but for now make sure your camera’s “read/write” light is off before the next frame is taken.
So to summarize: Your exposure time must be padded to allow the images to be fully written to memory before taking the next image. Your frame interval must be longer than your exposure time + buffer time. So…
Setting Your Exposure
Main Article:
Timelapse exposure and interval (a quick summary is excerpted below).
Also take a look at the time-lapse exposure video tutorial for a different angle on this topic.
Understand how to get the images you want
Now it’s ok if you are a little rusty on manual camera control. There are a ton of great online resources and books written and designed by some amazing photographers out there. I am always learning something new. As a refresher to how photographic controls work together to create an exposure, take a look at the timelapse exposure triangle below.

Time-lapse exposure triangle
If you are looking for more information on photography and exposure fundamentals here are a few resources to check out:
- Cambridge in colour (fantastic tutorials)
- The Photo Forum
- Digital Photography School
- Kelby.tv
Avoid time-lapse flicker
It’s the bane of many a time-lapse photographer. What starts to look like a good time-lapse video is suddenly spattered with some images that look brighter or dimmer than the others making your film appear to “flicker” or “strobe” a few times a second. Take a look at this example below:
Photographed in automatic (green) mode at a 1 second interval.
Flicker is covered in much more detail here:
- Why does flicker occur?
- Minimize it’s occurrence by
Combating timelapse flick video tutorial (main video tutorial)
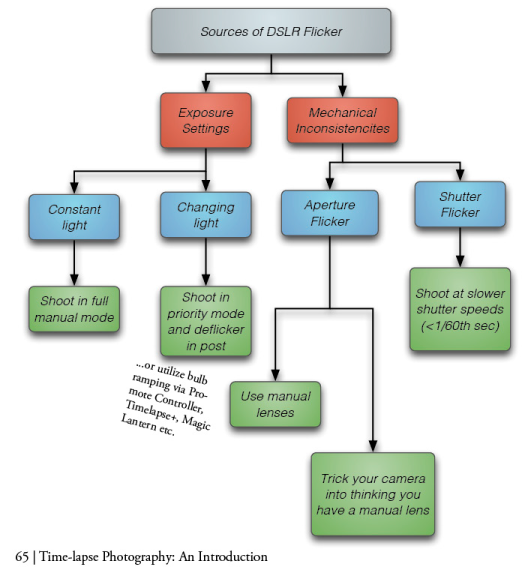
Timelapse book page 65: Flicker flowchart
If you have relatively constant light, shoot in MANUAL mode
Since there wont be too much light change in your scene eliminating the camera’s automatic light metering will greatly reduce the occurrence of time-lapse flicker. If you haven’t read shooting in manual mode yet, I encourage you to do so.
If your light will change consider shooting in APERTURE PRIORITY mode
We chat specifically about advanced exposure ramping intervalometers like the Timelapse+ and the Ramper Pro but for a quick in-camera quasi-solution consider AV mode. Manual mode might quickly over or under expose your image as the scene changes. For example if you set your exposure manually for a low light sunrise scene, as the view gets brighter your image will be quickly overexposed. Shoot in Aperture priority mode (Av mode on your camera dial) instead. Set your aperture and allow the camera to select the corresponding shutter speed for the desired exposure. Over time the camera will meter the changing light in your scene and adjust shutter speed automatically.
You will encounter more flicker but deflickering software in post production goes a long way to correct a majority of any issues.
The full timelapse processing software summary is here.
If you decide to shoot time-lapse in automatic mode of any kind, make sure you cover your DSLR camera’s eyepiece. Stray light can enter and affect camera metering.
Create motion blur by dragging your shutter
In still photography a fast shutter speed and minimal (or no) motion blur is usually the goal, but because time-lapse photography involves the blending of many still frames to create a moving sequence, we can utilize slower shutter speeds and motion blurring to create a smoother looking time-lapse compilation. Here’s how it works:

Dragging shutter example video
Motion blur occurs when the image being photographed changes slightly during its exposure. This “change” or motion is captured in the form of a slight blur. Think of this blur as extra information about what is happening within the scene . Since these images are played back-to-back in a compilation (or video), we see an added smoothness to the entire sequence.
Read more about shutter dragging here. You might also want to take a look at the exposure tutorial video where a dragged shutter time-lapse is compared side-by-side to one without dragging. The link is queued up to the spot.
Select an ISO setting
When shooting in manual mode DON’T FORGET to set your ISO to a specific value and remove it from automatic control. Keeping a low ISO setting will result in less photographic noise but will require a brighter scene. A higher ISO results in a sensor that is more sensitive to lower light situations but, it also subjects your final images to more random noise. Here’s a much more detailed ISO explanation with great examples.
White balance and file format
Selecting a white balance is very important if you are recording your images in the JPEG file format. White balance, or what your camera uses to determine the correct color temperature of the scene you are photographing, can create some pretty scary color casts if it is not selected properly.
I’ll defer to more expert explanations to foster a more solid understanding (this white balance tutorial is outstanding) but the best way to achieve the results you want is to shoot in the RAW file format. Shooting in RAW allows you to correct after the photo has been taken and gives you much more control than what might be available in your camera’s menu options.
Select manual focus
You’ll want to hit the switch for manual focus for most time-lapse projects. I usually lock a good focus using autofocus then switch it to manual mode before I begin shooting.
A good tip to ensure proper focus is to take a test photo, view it, and zoom into different parts and check. Alternatively you can switch your camera into live view and zoom into your image allowing you to manually adjust your focus until the image looks good.
Don’t worry, you’ll get better
All this information may seem like a bit of an overload but I assure you as you get some tests under your belt and you take your time to think time-lapse it becomes intuitive.
Think about what is changing in your scene, and how will your camera settings capture that change? Ask yourself, am I allowing any aspects of the exposure to be controlled by my cameras automatic light meter, and if so how is that likely to affect my images when I compile them together?
Creating the timelapse movie
Now that you’ve got a boatload of images I’m going to suggest your throw a few away, well maybe the first one or two. Sometimes when you start your time-lapse recording you may have touched the camera or tripod somewhere so to be sure there is no movement throw one away.
Compiling the images
Here is a list of applications that can work to stitch together your time-lapse compilation. Screen capture tutorials would be the best way to show and explore the how-to process and I should have some available on these applications soon. I have not used everything yet and I primarily use Adobe After Effects CS5. (The full timelapse processing software summary is here.)
Aftereffects ($699 or $29/mo)
LRTimelapse (Free eval version, $116)
Photolapse (Free)
Premiere Pro ($699 or $29/mo)
Quicktime Pro ($30)
VideoMach (Free)
VirtualDub (Free)
Consider deflickering software
GBDeflicker ($99)
CHV Long Exposure plugin for FCP (Time-collection $39)
LRTimelapse (Free eval version, $116)
VirtualDub with MSU Deflicker (Free)
Got some flicker? It’s ok, well sorta. There are several options available to “deflicker” your time-lapse compilation during post production and most of them work quite well. I have the most experience using GBDeflicker a plugin for Adobe application and also a stand alone Windows application. I will be providing a tutorial on how to use this soon as well as other methods for a greater range of budgets and computer types.
A final note
Never let the time-lapse take the fun out of a scene.
I’ll admit it. I’ve stepped outside, looked at the incredible shape and movement and color of the clouds as the evening sunset nears, run back inside, grabbed my gear, sped off to the shore, got everything setup and programmed, only to miss it all as the sun had already set and the clouds have moved by.
I’ve driven to locations and lugged gear down trails only to have forgotten my camera’s memory card or a tripod release plate.
I’ve stayed up until 4:30 am testing astrophotography timelapse settings only to really botch it all and have nothing usable.
Always enjoy and respect the property and scene in front of you. Many time-lapse compilation involve scenes of beauty in nature. With your help we can help preserve and protect these views for others. A few bad apples could stop all future photographers from enjoying a scene or unique vantage point.
Share
We are learning new things all the time and we need your help.
[…] Sharing DSLR Time-lapse Photography Workshops and Tutorials; Education and Experimentation Time-lapse Photography How-to Guide […]
[…] Sharing DSLR Time-lapse Photography Workshops and Tutorials; Education and Experimentation Time-lapse Photography How-to Guide […]
[…] Sharing DSLR Time-lapse Photography Workshops and Tutorials; Education and Experimentation Time-lapse Photography How-to Guide […]
[…] Sharing DSLR Time-lapse Photography Workshops and Tutorials; Education and Experimentation Time-lapse Photography How-to Guide […]
[…] Time-lapse Photography Education and Experimentation Time-lapse Photography How-to Guide […]
[…] fun to read was “Learn Time-Lapse Photography” and they offer a short, but thorough, how-to guide and a fantastic […]
[…] Part of the Time-lapse photography how-to guide: https://www.learntimelapse.com/time-lapse-photography-how-to-guide/ […]
[…] https://www.learntimelapse.com/time-lapse-photography-how-to-guide/ […]
[…] The Time-lapse Photography How to Guide […]
[…] FOR any beginner’s out there (like me lol) read this tutorial first: https://www.learntimelapse.com/time-lapse-photography-how-to-guide/ […]
test
Worth mentioning too: use a tool like http://sunrise-sunset.org/ to exactly know when the sunrise and the sunset is. Will probably save you a lot of time and space in your memory card/hard disk too.
Thanks for the guide Ryan, really helpful!
Leti
Previously I did not thought much about the technical part of photography but now yes it is needed to be aware of all the tools and techniques.Thanks for listing most of them in one post.
I have a Nikon D800 and hear it has a built-in intervalometer. I’ve not tried it yet as I’m just beginning in time-lapse photography. Is there a difference between an intervalometer that I purchase and the one that is built-in my D800? In other words are there additional settings/features that I might find on an external unit?
for Startrail photography I’ve had fantastic results with the canon G 16 built-in function.
[…] https://www.learntimelapse.com/time-lapse-photography-how-to-guide/ […]
[…] For more tips on how to shoot time-lapse video, check out this informative link. […]
[…] The ins and outs of shooting time lapse are on the rise in EPS and I ran across a good web page the other day for those of us just starting out. There is plenty out there on the web to try and process in your head but this one looks to me like a good place to begin. https://www.learntimelapse.com/time-lapse-photography-how-to-guide/ […]
[…] Part of the Time-lapse photography how-to guide: https://www.learntimelapse.com/time-la… […]
[…] https://www.learntimelapse.com/time-lapse-photography-how-to-guide/ […]
[…] to the wrong mode? The article also mentions the flicker problem and offers some ways to solve it. (https://www.learntimelapse.com/time-lapse-photography-how-to-guide/) So I think I will try the AV mode again and see if it works better than […]
[…] those interested in getting started shooting timelapse photography, I highly recommend reading this excellent guide or this tutorial including a brief section on astrophotography timelapse (shooting timelapse […]
[…] aux personnes intéressées par se lancer dans la photographie en accéléré la lecture de ce guide excellent ou de ce tutoriel comprenant une section brève sur l’astrophotographie en accéléré (la […]
[…] die sich dafür interessieren, in die Zeitraffer-Fotografie einzusteigen, kann ich diesen ausgezeichneten Ratgeber oder dieses Tutorial sehr ans Herz legen, das auch einen kurzen Abschnitt über […]
[…] タイムラプス撮影を始めたいと思う方は、この優れたガイドもしくは天体の経過時間(星空のタイムラプスシーケンスの撮影)に関する短いセクションを含むこのチュートリアルをぜひお読み下さい。 […]
[…] fosse interessato ad avvicinarsi alla fotografia time-lapse, consiglio vivamente la lettura di questa eccellente guida o di questo tutorial, tra cui una breve sezione su time-lapse dell’astrofotografia (le […]
[…] (https://www.learntimelapse.com/time-lapse-photography-how-to-guide/) […]
[…] Timelapse tehnika […]
[…] neko želi da nauči više o timelapse fotografiji, preporučujem ovaj LINK, a tu su i tutorijali na […]
[…] Here is a link I found very helpful in learning time lapse photography: Time Lapse Info […]
[…] https://www.learntimelapse.com/time-lapse-photography-how-to-guide/ […]
[…] time around mid July, I was inevitably bitten by the time-lapse bug. Right then, I knew it wouldn’t be long till I grabbed my gear and went out to try my […]
[…] as far as customization goes the 950 is right up there with the best of them as you can adjust the time lapse settings, photo stamp, flash setting, detection circuit, PIR settings and […]
[…] […]
[…] is dit iets? https://www.learntimelapse.com/time-l…-how-to-guide/ Met citaat […]